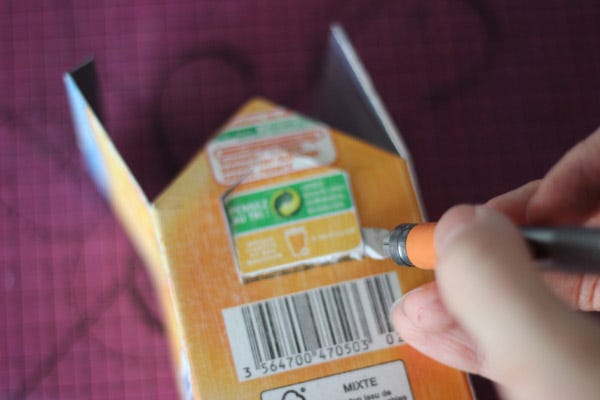
Step 1: sand the juice carton lightly to ease the paint's adherence or use a universal primer.
2 _ 10
Step 2: on one of the sides, trace a line at 10cm high from the bottom. Make sure to press your pencil hard enough against the carton to mark the fold (it'll be the roof's base) and repeat the process on the opposite side.
3 _ 10
Step 3: on both other sides, draw a mark in the middle of the carton at 14cm from the bottom. Then, trace lines that join the middle mark to the end of the lines traced previously. Then, add 1 cm flaps to help glue it later on.
4 _ 10
Step 4: measure the length of the slope of your roof and add 10cm to that number. That'll give you the height to which you have to trace a line for the roof of the 2 last sides (circa 16cm). Then, draw a 1cm flap on one side.
5 _ 10
Step 5: these lines shape the outline that you will have to cut out to have a house. Take out the top of the carton and cut around the flaps.
6 _ 10
Step 6: on one of the roof's side, cut out a 3cm x 0,5cm gap for the coins.
7 _ 10
Step 7: cut out some windows and fasten some slightly bigger tracing paper on the inside with tape.
8 _ 10
Step 8: glue the flaps to close the money-box. Then, with a few pieces of papier-maché, hide the glued parts and the edges for a nice finishing touch.
9 _ 10
Step 9: paint the whole house with one or more coats of painting.
10 _ 10
Step 10: with a paint marker, draw some decorations (door, windows, bushes, flowers...).
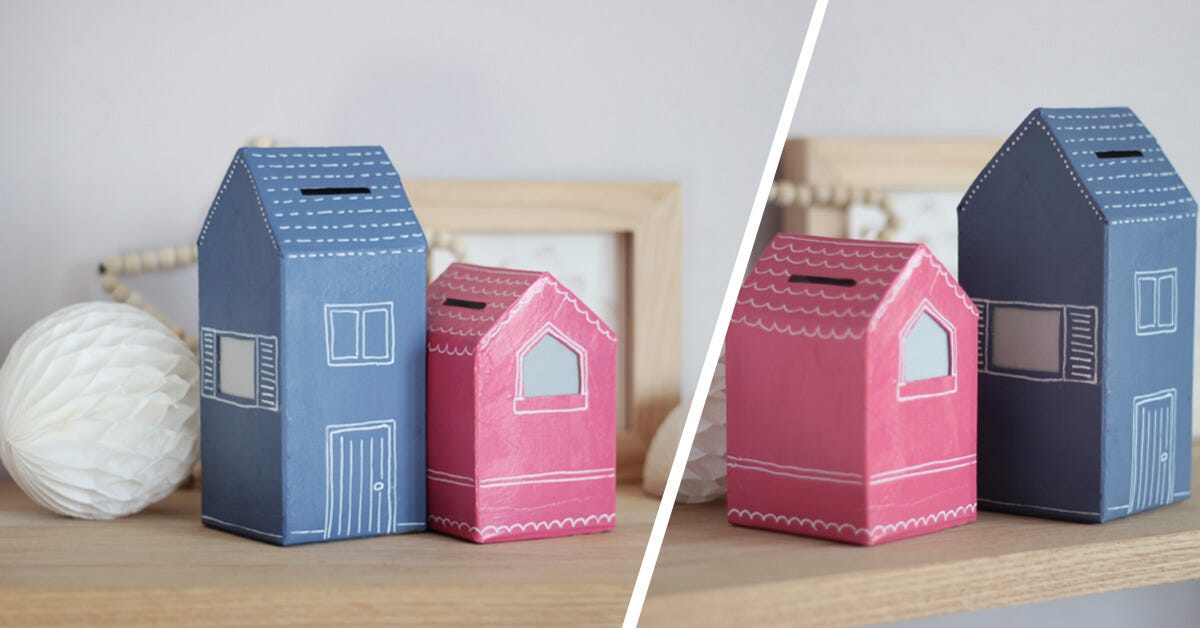
We’re making a pretty money box for the kids, so that they can fill it with the Tooth Fairy’s little gifts.
To do so, we simply need to recycle an orange juice box and use some newspaper!
Essentials
For this DIY, you will need:
a 1L juice carton
scissors
cutter
paint
paint markers
sandpaper
newspaper
tracing paper
scotch tape
and… wallpaper glue or vinyl glue mixed with flour
Steps
1
Step 1: sand the juice carton lightly to ease the paint's adherence or use a universal primer.
2
Step 2: on one of the sides, trace a line at 10cm high from the bottom. Make sure to press your pencil hard enough against the carton to mark the fold (it'll be the roof's base) and repeat the process on the opposite side.
3
Step 3: on both other sides, draw a mark in the middle of the carton at 14cm from the bottom. Then, trace lines that join the middle mark to the end of the lines traced previously. Then, add 1 cm flaps to help glue it later on.
4
Step 4: measure the length of the slope of your roof and add 10cm to that number. That'll give you the height to which you have to trace a line for the roof of the 2 last sides (circa 16cm). Then, draw a 1cm flap on one side.
5
Step 5: these lines shape the outline that you will have to cut out to have a house. Take out the top of the carton and cut around the flaps.
6
Step 6: on one of the roof's side, cut out a 3cm x 0,5cm gap for the coins.
7
Step 7: cut out some windows and fasten some slightly bigger tracing paper on the inside with tape.
8
Step 8: glue the flaps to close the money-box. Then, with a few pieces of papier-maché, hide the glued parts and the edges for a nice finishing touch.
9
Step 9: paint the whole house with one or more coats of painting.
10
Step 10: with a paint marker, draw some decorations (door, windows, bushes, flowers...).
You’re cute house money box is done! And if one day it’s full… you can make a new one!
This Wednesday DIY has been created by Calie. Discover all of her DIY ideas on her blog Idée Créativeand Facebook page.


 WARNING